You can do quite a bit with GPIO (general purpose input/output) pins on devices like the Raspberry Pi and Beaglebone. Here I’ll show you how to set it up to perform a couple of simple tasks, like blink an LED and read the temperature from temperature sensor called the DS1820B. If you don’t know much about electronics, that’s OK – there’s nothing major here, just a few points to follow as you go along. I’ll explain them in further detail at the right time.
Setting Up
These examples will focus on the Raspberry Pi, because that’s what I have easiest access to, but with some minor modifications they could work with a Beaglebone black. At the time of this writing, Swift is available for the Raspberry Pi 2 & 3, including package manager. You can download the Swift 3.0 binaries from Joe Bell’s Jenkins build if you don’t wish to compile Swift yourself. I personally like to keep a couple versions of Swift builds and symlink to the “current” one, with ~/swift/current/ (a symlink) listed in my bash profile’s $PATH list. That way I can change the symlink at will.
Side note: I work with both Raspbian and Xenial (Ubuntu/ARM). At the time of this writing, there appears to be some issue getting the 1wire interface to work on Xenial, though I am able to compile swift completely, which proves difficult on Raspbian. Basic functionality, like blinking LEDs, seems to work on Xenial, but I haven’t had an opportunity to try other interfaces. On the surface level they appear available and usable.
Sanity + Smoke Test
The ribbon cable between the Raspberry Pi and the breakout board can be inserted either way (right or wrong), so it’s important to do the check first. Hook up your jumper cables from the 3.3 or 5V pin on the breakout to the breadboard row containing your 220Ω resistor. Following this diagram below. Make sure your LED is inserted properly (long let at positive). Click for full-sized view.

Next, connect the jumper from 3.3V to the row corresponding to GPIO Pin 17.
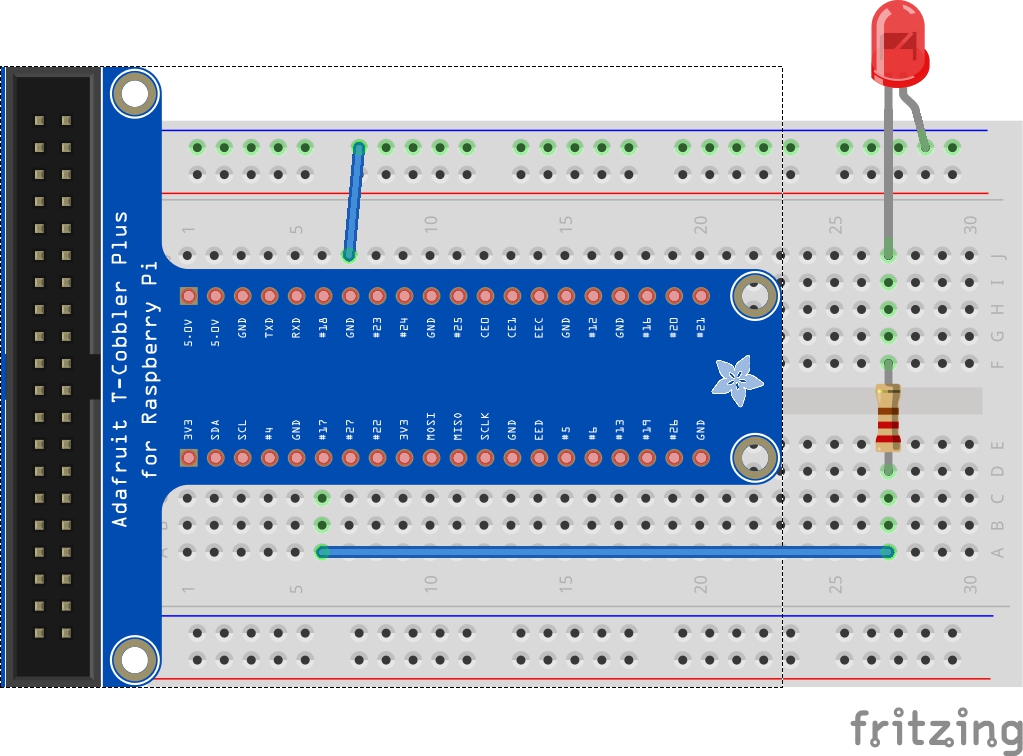
It may be worthwhile to install WiringPi so you can test GPIO connections via the command line rather than compiling swift every time. In our example above with pin17 connected to the LED:
gpio mode 17 out
gpio write 17 0
gpio write 17 1
This should work for you, but I did run into some issues from time to time where it simply refused to work properly (I’m sure I did something wrong!).. You should see the LED turn on.
SwiftyGPIO
Check out SwiftyGPIO and see how the examples are configured. It’s quite straightforward. Using this, we’re going to build on them to read from a 1-wire digital temperature sensor (DS18B20). Let’s get started configuring the Pi to user the 1-wire interface.
First, a brief overview. You define the GPIO type by passing an enum value for your hardware. In this case the .RaspberryPi2 applies to both the Pi2 and Pi3. We’ll go with that. We’ll then keep a reference to the GPIO #17 pin, as in the above smoke test. Note that this is the actual GPIO number, not the number as it would apply to the pin number on the circuit board.
let gpios = SwiftyGPIO.GPIOs(for:.RaspberryPi2)
var gp = gpios[.P17]!
You set the direction (either IN for things like sensors, or OUT for things like LEDs)
gp.direction = .OUT
and finally turn on the LED,
gp.value = 1
From the SwiftyGPIO examples, let’s look at what a continuously blinking LED program would look like, modified for our hardware example.
import Glibc

let gpios = SwiftyGPIO.GPIOs(for:.RaspberryPi2)
var gp = gpios[.P17]!
gp.direction = .OUT

repeat{
gp.value = (gp.value == 0) ? 1 : 0
usleep(150*1000)
}while(true)
You can include the SwiftyGPIO.swift file next to your main and compile the whole with swiftc *.swift && sudo ./main
The programming really isn’t very hard, so let’s move on to our temperature sensor.
Hardware Config
First you need to enable GPIO on the Pi, and to do that you need to write some configs to the boot config file. If you’re running Raspbian (and expect to use pre-build binaries), you’ll need to edit the /boot/config.txt file; if you’re on Xenial/Ubuntu, it’s /boot/firmware/config.txt .
add this line to the end, if it’s not already in there:
dtoverlay=w1-gpio,gpiopin=4
Reboot the machine.
You’ll then need to check that everything worked just fine
sudo modprobe w1-gpio
sudo mod probe w1-therm
cd /sys/bus/w1/devices
ls
cd 28-{rest_of_id_number}
ls
cat w1_slave
The output will look something along these lines,
b9 01 4b 46 7f ff 0c 10 f2 : crc=f2 YES
b9 01 4b 46 7f ff 0c 10 f2 t=27562
That t= value is degrees C * 1000. We’ll end up parsing it in the readTemp program.
See this set of articles for further details.
Temperature Sensor
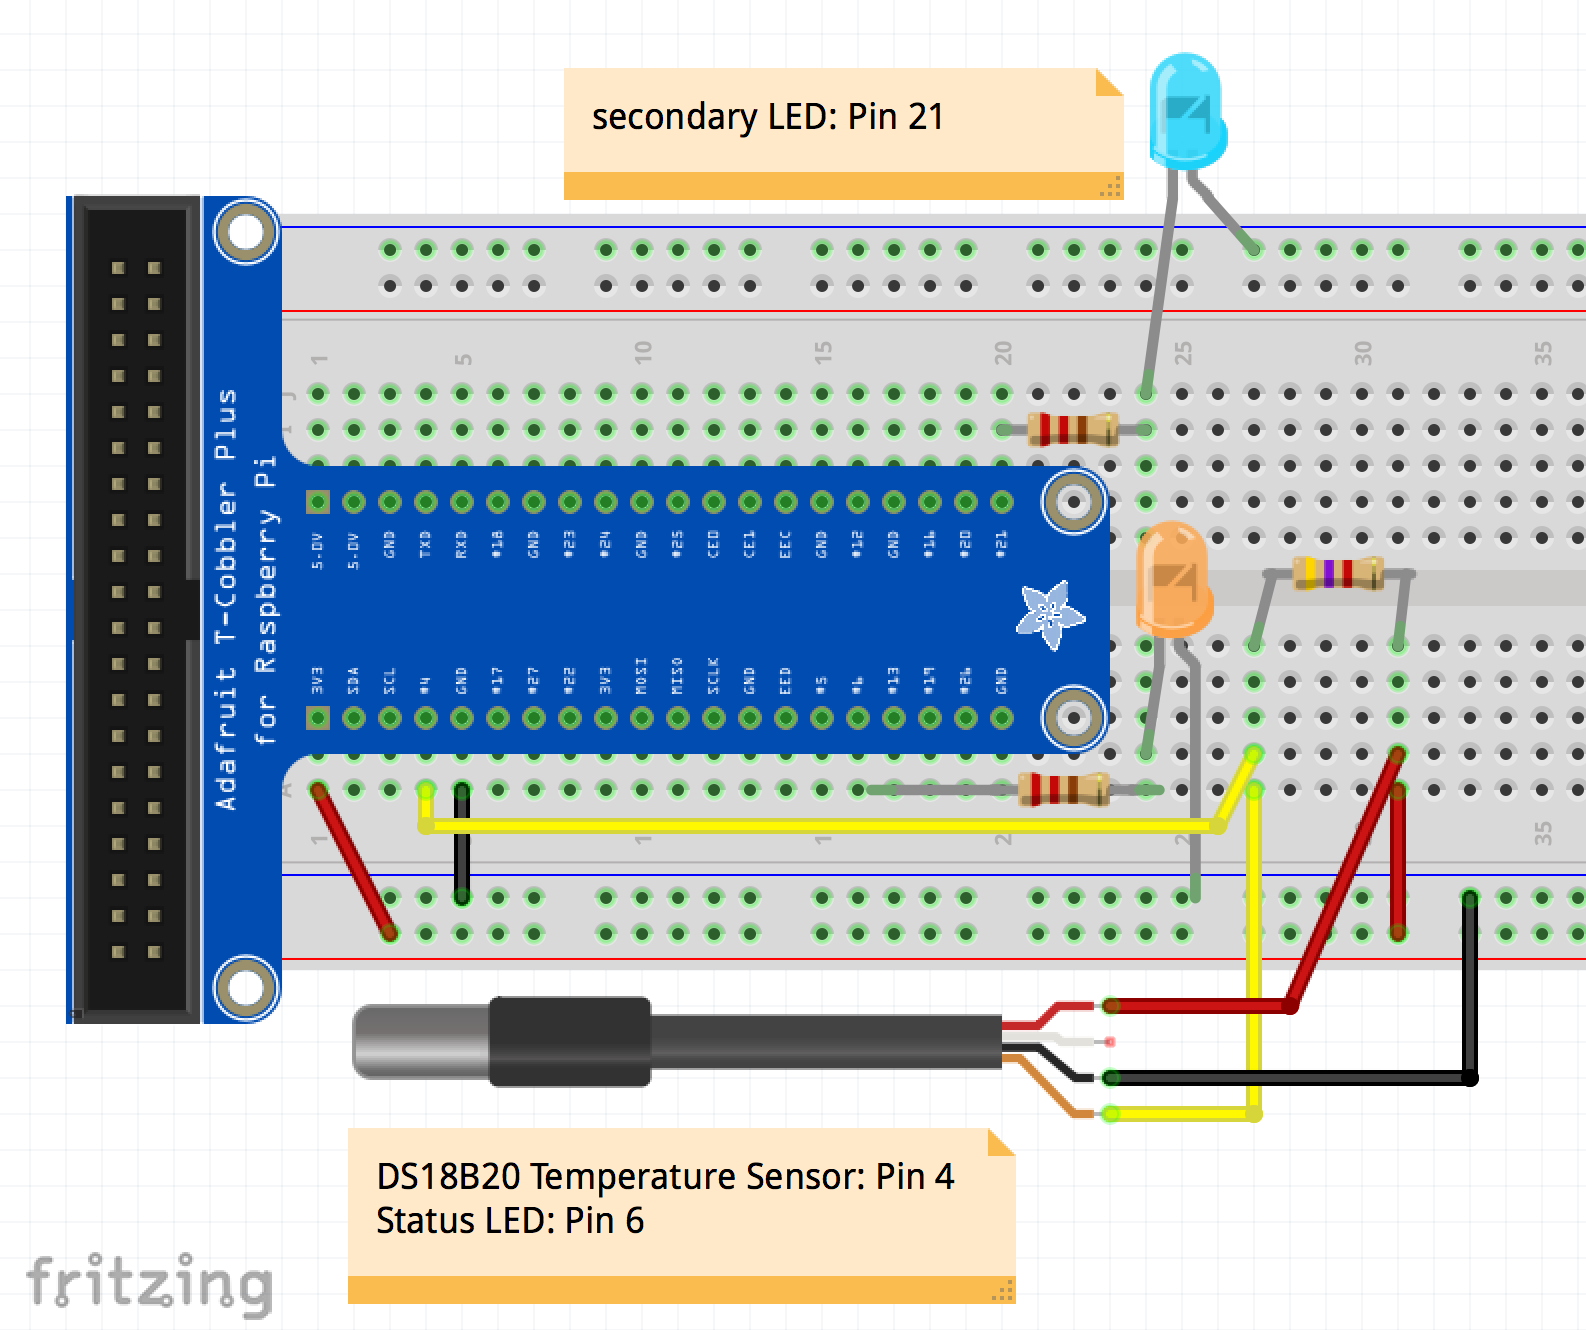
Here’s a little program (http://github.com/iamcam/swiftyArm/readTemp) with 1-wire temp sensor (DS18B20) and two status LEDs. Follow the wiring diagram below. I’ve included the Pin numbers on labels because sometimes the Fritzing pin numbering can be a bit blurry. The gist of this little project is to perform a temperature reading whilst making an LED blink on a separate thread
Assuming you have a functioning Swift build on your Pi, you should be able to download the repo, build the readTemp project with package manager, and run the output.
$ swift build
Cloning https://github.com/uraimo/SwiftyGPIO.git
HEAD is now at d6fd508 Updated package name, new release
Resolved version: 0.8.2
Compile Swift Module 'SwiftyGPIO' (4 sources)
Compile Swift Module 'readTemp' (3 sources)
Linking .build/debug/readTemp
Then execute it:
$ sudo .build/debug/readTemp
Some lights will blink and partway through, the read status LED will illuminate and the temperature will print out to the command line,
27.562 °C / 81.6116°F
And that’s about it. Besides getting a stable Swift working, this project wasn’t very hard. Getting the wiring set up properly is probably the most difficult. Surely in a few months time we’ll have a stable Swift that’s less of a moving target.